|
P11: Setting up the Simulator III
|
|
How Does The App "Add2" Work? On the previous page we ran through the menu and prompt process. Now we should look at the "Add2" application itself. Remove the BP you have on line 213 and instead place it on line 212, "jsr Add2". In the IDE window: Simulation | Stop File | Clear Memory Rate | Ultimate In the Assembler window: Tools | Assemble & Load In the PD window: Set one-shot IN value | 31 Output Terminal: Clear Input Terminal: Send Hex Bytes | 31,32,33,34
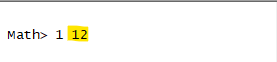
Step by Step Now begin the sim from the IDE "Simulation" dropdown menu with "Start". Within a half-minute or so it should pause at the breakpoint you placed on line 212 at the "jsr Add2" instruction. If you look under the IDE's "Rate" dropdown menu you'll see "Ultimate" is no longer chosen. Instead "Step by Step" has been selected: its function key is <F2>. While your mouse cursor is in the IDE window, press <F2> to advance one instruction. That should put the app line cursor on line 237. If you happen to click off it, no worries: the sim has placed a black dot on line 237 as a marker to where you were last. "jsr kpWrite runs which displays the menu selection of 1 that you chose by way of the "one-shot IN" value of $31 you set earlier. Advance using <F2> until the code cursor is on line 239.
Prelude to Indexed Addressing Next the "Add2" app wants to use Indexed Addressing so it primes variable "Cnv2HiLo" with $02 in "Cnv2Hi" and $12 in "Cnv2Lo". If you glance up at the comments below the "Add2" blocked header you'll see that "Cnv2Lo" uses address $0012. So we could say that address Cnv2HiLo points to Indexed Address Cnv2HiLo of $0212. Do not advance any further just yet. Two other variables, "AddSum" and "Carry2NSB", are both zeroed out starting in line 243. The next function starting on line 247 and finishing on line 253 displays "Add two 2-digit hex numbers (bytes)" title line. That is followed by a newline with "jsr CRLF" and horizontal spacing with "jsr spaces7". In line 257 our character indexing register, X, is zeroed as the next message to the user is issued. You'll notice that quite a few message lines have been commented out with ";;;" to save time when testing with the Sim. Set a BP on line 265 and another on line 267. Then use <CTRL><F6> within the IDE window to skip ahead to the line 265 breakpoint.
Indexed Addressing We set register Y to 0 in line 265. Press <F2> twice to advance to the subroutine "getByte" in line 539. It saves the current state of all registers (A, X, Y), runs kpChecker to ensure the user will only enter valid hex bytes, and stores the first keypress in line 552. Notice how "kp2Lo" is bounded with parentheses as shown here: "sta (kp2Lo), y". This statement means store the valid hex keypress in register A into the address pointed to by "$0212 + y". Register Y is currently zero so we expect the first keypress to be stored at address "$0212" and the next at address "$0213" if register Y is advanced to "01" from "00". "getByte" finishes in lines 599 to 603 by restoring the stored registers but in reverse order.
Show Me! To prove the statement we just made to be true, let's enable a feature under the IDE's "Tools" menu called "Watch Variables". Working with this tool is worth its annoying idiosyncrasies. Let's add in "kp2Lo" at "$000E" and "kp2Hi" at "$000F", followed by the indexed address of "kp2HiLo" at "$020E": Add | kp2Lo | Short | 000E | Add Add | kp2Hi | Short | 000F | Add If we read from the higher address "$000F" we can see the full indexed address is "$020E". (Indexed addresses always start with the lower byte.) Continue with: Add | kp2HiLo | Integer | 020E | Add Do the same for "Cnv2Lo" at "$0012", "Cnv2Hi" at "$0013" and "Cnv2HiLo" at "$0212". Now press <F2> to continue on while watching the variables in the new window. Press <CTRL<F6> to skip ahead to the next BP on line 267.
Show Me More! It might be nice to see "everything" currently in memory, too: IDE | Tools | Memory Editor. We'll call it ME1. IDE | Tools | Memory Editor 2 (ME2) Use the mouse scroll or ME2 window slider to advance to address $0200. Personally, I like to leave address $01F0 showing so we can see what's going on in the Stack, too. Check out the screenshot below to see how we often arrange the windows.
Processing the User Bytes In the Output Terminal you should now see "12". This is the byte our virtual user entered via the Input Terminal's "Send Hex Bytes" function.
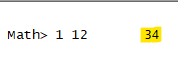
In the Watch Variables window examine "kp2HiLo" which should now show $31 as the high byte and $32 as the low byte. You'll see them also in ME2 at indexed addresses "$020E" and "$020F". Line 268 shows the value $12 being stored in variable location "Num1". Add "Num1" as a "Short" at address $40 in the Watch Variables window. As you move forward with <F2> you'll see register Y being reset in line 279. The subroutine "getByte" runs next so let's set a BP on the line after it then speed through "getByte" with <CTRL><F6>. Variable "kp2HiLo" should now contain the next byte the user wishes added to the first byte already stored in "Num1". Add variable "Num2" as a "Short" at address "$42" to the Watch Variables window, then advance to line 283.
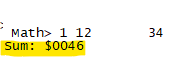
And Now For The Math We don't currently know the state of the Carry bit in line 285 so it's cleared with the instruction "clc". Line 286 loads the value in "Num1" ($12) and then the value in "Num2" ($34) is added to it in line 287 with "adc Num2". The result in register A is stored in "AddSum" in the next line, followed by a "Branch if Carry is Set to Next" in line 289. Use <F2> to slowly move through the lines while keeping an eye on the Carry Bit in the IDE window. There was no Carry because the sum of the addition did not exceed $FF, so there is a jump to line 296 where the output message of "Sum: $" is produced. If there had been a Carry then the control would have branched to line 291 so the Carry could be displayed. If there was a Carry, line 307 would have occurred before line 311. Set a BP on line 317 then use <CTRL><F6> to speed ahead to see the sum in the output terminal window. And finally in line 317 there is a "Return To Subroutine" that will return us to line "213" which will display the prompt once again.
And that's a look at using the OshonSoft 6502 Simulator to follow your coding so that when something breaks you can put your finger on What and Where as you figure out the Why.
|

![]()
Updated 2024-01-15
![]()