LEDs - 01
|
In this section we are going to: - set a few IDE options - create a new project - add a source file (.c file) to the project - compile, link and download the code to your dev board |
|
Set a few IDE Options: Navigate to Tools | Options | General. Only the first and last checkboxes are chosen by default. I have also included: - Load last project on startup - Show the full path in the document window's title bar
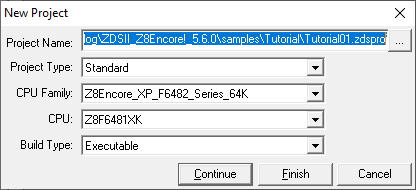
Create a new project: We have already configured the ZDSII IDE for our dev board, the "ZCOG" and we tested its ability to compile and download using the ledblink.zdsproj project files. This time we'll create a new project. Complete the following steps: - File | New Project - Project Name: use the menu's ... ellipse button and the Windows up arrow to go up one folder level to samples. In it you should find the Tutorial folder we created earlier. If it's not there, use the Windows Create New Folder button to create it. Once you have selected the Tutorial folder, type Tutorial01 to create the project filename that will end in .zdsproj. Ensure the rest of the New Project form resembles the one below:
- Click Continue and click Next but pause on Step 2 - Target and Debug Tool Selection screen. Choose the ZCOG system for your Target, and select USBSmartCable for your Debug Tool. Click Next and then Finish. Your screen should resemble what's below but no files other than Tutorial01.zdsproj have been added yet. In the activity panel at the bottom of your IDE there should be indications that the ZCOG and USBSmartCable hav been activated.
Add a source file to the project: We need to add a C language source code file to the project: File | New File. This should be saved right away using File | Save As | Tutorial01.c
Add the C file to the project: Project | Add Files | Tutorial01.c. You should now see a + expand button beside the top folder in your project window: click it to expand it. So far the only file added is your .c file. Save your project again.
Keeping an eye on things: I like to keep a separate File Manager window open for the TUTORIAL folder we created in the ..\samples folder. If you were to do the same, you would now notice that a Tutorial01.wsp workspace file has also been created.
Add code to our blank Tutorial01.c file: Within the code window in the right panel, type the following:
Follow that up using File | Save As and use the existing filename, Tutorial01.c.
Build your project: Click Build from the top menu, followed by Build from within that menu. Files will be compiled and linked to produce the final program for downloading later. The bottom status panel should indicate no errors. Save your Project once more.
Download the code onto your dev board: On your IDE screen, you should see a dropdown window with Debug selected. If instead you see Release, change it to Debug. At the top menu, choose Debug and then Go. Note that at the top of this menu, choosing Connect to Target and then Download Code will accomplish the same thing as Go. You should expect to see the progress indicator below, followed by no errors in the lower panel. (If there is an error, unplug the cable at both ends and plug it back in.)
Whether you perform the single or two-step method, there should be a progress indicator, followed by a "...\Tutorial01.lod successful." in the lower panel. Congrats - you have compiled and downloaded a program to your dev board. It won't really do anything yet but we know the process works. |

