|
Z80 Programming II |
|
Z80 Assembly Coding: Optimizing Code |
|
|
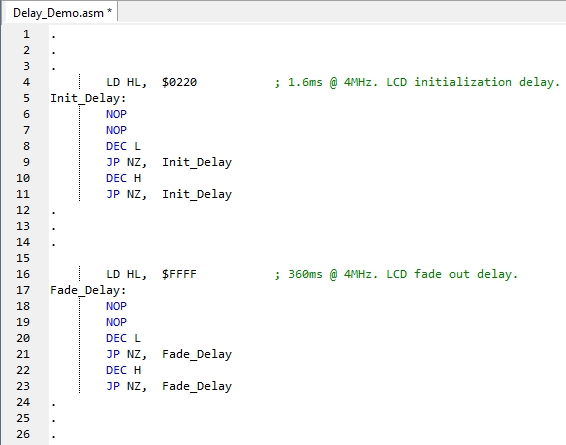
Overview: In this segment we're going to look at optimizing code, or at least reducing repetitiveness. In the Z80 Assembly code on the right, there are two necessary delay routines used by an LCD panel connected to our CPU via an 8255 PPI. The first routine is required during LCD initialization before we start sending commands. The second routine is used after displaying a banner message and before clearing the display. You can find the code here for Delay_Demo.asm
Operation of First Delay: Value $0220 is loaded into register pair HL. In actuality, the hex value 02 is loaded into register H and the value $20 is loaded into register L. Next we see the label, Init_Delay in line 5. Two "no operation" NOP commands are added next to stretch the delay. With the "DEC L" operation, the starting value in register L is decremented by 1 from $20 to $1F, it is compared to 0 in the next command "JP NZ, Init_Delay", and because it (1F) is non-zero we jump back to the label, Init_Delay. The program continues to jump back to the label. Each time the program goes through the two NOPs, register L is decremented, and then a comparison of the contents of register L is made with 0. When register L is finally decremented to 0, the statement "JP NZ, Init_Delay" fails and the program moves to the next line. Initially register H was 02. It is now decremented to 01 with operation "DEC H" in line 10. The H register is not equal to zero so the jump is back to Init_Delay. Once again we start through the loop: two NOPs are executed and then register L is decremented. Recall that register L was at value 0 before we fell through the loop to line 10. Now that DEC L is taking place in line 8, the value 00 is decremented to $FF. That means we can expect 256 jumps to Init_Delay before register L is finally down to value 00 for a second time. And once again, the "JP NZ, Init_Delay" instruction falls through and we are at "DEC H"; register H will transition from 01 to 00 and the compare with zero instruction will execute. However, register H is equal to zero so now the Init_Delays loop is done. Execution will continued with the next instruction in line 12, whatever that is in the program. So, how long did the loop take? We ran the program through OshSoft's Z80 IDE in turbo mode to speed up the instruction count and it gave us a finite number of cycle times. We divided those cycle times into a CPU clock of 4MHz and came up with the value 1.6 milliseconds.
Operation of Second Delay: The operation of the second delay with the header Fade_Delay is fundamentally the same as the first delay routine except that the accumulated time value is about 1/3 of a second. The delays appear identical. The only real changes are the labels and HL register values. So why don't we create one delay routine but feed it two different starting values? |
|
|
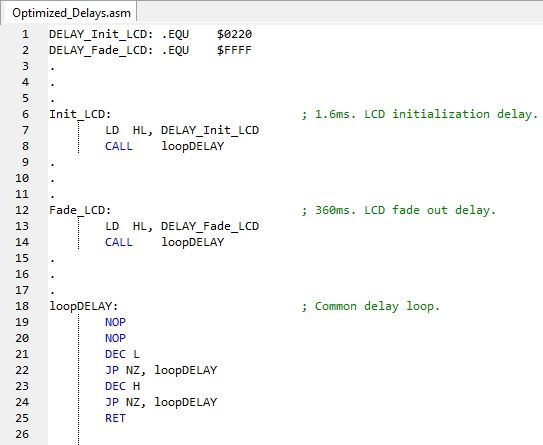
Optimization: Line 6 in the adjacent panel shows the label Init_LCD that we're using to demarc our code for the LCD initialization routine. Jump down to line 7 and you'll see register HL loaded up with the value $0220 that we "equated" earlier in the program at line 1: the label DELAY_Init_LCD has the value $0220. Once registers H and L are "primed" in line 7, a CALL is made in line 8 to the label "loopDELAY" in line 18. Here we see the same loop that we worked through in the upper example, Delay_Demo.asm, with the exception that we added a RET at the end. If you examine the program, you'll only see the loop typed out once. Once the loop completes, a "RET" returns the Program Counter to the line after the CALL on line 8. We're not showing any additional code here in line 9 but you got the idea. Line 12 demarcs the fade LCD routine via the label Fade_LCD. In line 13, register HL is primed with value $FFFF from the earlier equate found in line 2 for DELAY_Fade_LCD, and then a call is made to loopDELAY. When the loop completes, a RET will take us to the line following the CALL in line 14.
In summary, we found code common to both loops shown in Delay_Demo.asm so we created a common loop that both could use in Optimized_Delays.asm.
You can find the code here for Optimized_Delays.asm
The file delays.asm has even more examples of delays you may find useful.
|
|