|
ROM BIOS Test |
|
Info & Guidelines |
Resources |
|
Overview: To test our ROM BIOS program, we'll use the earlier hardware configuration involving the 16550 UART and the TeraTerm v4.99 terminal emulator. Note this is BIOS v1.0, dated 2018-10-27. The BIOS is being continually updated. The most recent download of all required files is M62-BIOS - 20190203-2047 - V1.2.3.zip This version is NOT used in the examples below. When I get the time, I'll update the examples below with the latest code.
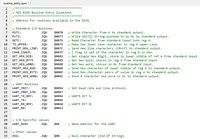
Giving Credit Where It's Due: Peter Murray of 39k.ca initiated and developed the idea of a ROM BIOS for the Z80 project. The BIOS will contain numerous function calls available to any program or application including the ROM Monitor. Examples could include calls that provide functions like convert2upperCase, printCharacter, printString, etc. Each function call and its address in the m62bios.asm file is documented in the routine_entry.asm file. An example of routine_entry.asm is shown in the adjacent panel.
How does it work? Open m62bios.asm in your favourite editor, possibly Programmer's Notepad, that provides line numbers, coloured text, etc. The BIOS I/O routines table that we copy into routine_entry.asm for standalone programs starts in line 39. The function calls unique to the 16C550 UART start in line 53. More routines will be added to the BIOS and to routine_entry.asm, as well. The BIOS program starts in line 70. The UART is initialized, a welcome message is displayed, and then we jump to the brief BIOS menu system which is found in the bios_menu.asm file. All of the files needed to run the BIOS are included at the bottom of m62bios.asm.
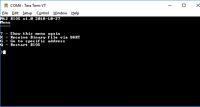
How do I test my BIOS? Download BIOS.zip, expand to its own folder, and then run Assemble_m62bios.BAT. This will create m62bios.obj which you'll need to burn to a ROM. You will only need to do this once. Connect TeraTerm to your Z80 system and hit the Z80's Reset button. The terminal emulation display should be the same as the adjacent screenshot, ROM BIOS Bootup Screen. The BIOS menu functions are limited at this time: you can upload a standalone program to RAM or execute a program at a particular address. We are going to upload a standalone program and then execute it in our upcoming examples.
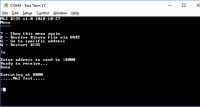
How do I get my standalone program into RAM? Once the BIOS menu is running, we select "X" for binary transfer. When prompted for a location to load the file into, type "$8000". In TeraTerm499, choose File | Send file (ensure Option: Binary is checked), and select the test1.obj file. The results should be as shown in the adjacent panel: test1 Standalone Program Note that there is a file transfer start timeout value of about 13 seconds in the Binary Receive function so...
How do I create a standalone program? Open test1.asm. You'll notice a "MLOCATION" variable near the top that specifies where in the RAM this program will run; I've chosen $8000. Change the code to whatever RAM location you like but don't forget to write it down somewhere for later. Below the variable is an assembler INCLUDE for routine_entry.asm. It contains all of the references to BIOS function calls in m62bios.asm. For example, line 12 in test1.asm calls for "PUTS" followed by "PRINT_NEW_LINE". If you open routine_entry.asm, the function call PUTS is showing an address of $0073. Where did we get this from? Open the m62bios.lst file. On line 41, you can see the text "PUTS:". To the left of it (if you are using TASM.EXE as your assembler) is the address $0073. Because we will expanding the BIOS in a structured fashion from its initial model you are seeing here, we expect the pointers to the function will stay static. So, line 41 reads "C3 B0 01". C3 is the JP command. Bytes B0 01 are the Little Endian address the function is located at. So we need to rearrange the address from B0 01 to $01B0 and navigate further down in m62bios.lst to address $01B0, and sure enough we find the function PUTS which prints strings to a terminal emulation program like TeraTerm. PUTS points to _PUTS, in case you're wondering. Now let's return to test1.asm. The MLOCATION variable of line 7 is used in line 10 to originate (.ORG) the program to location $8000. Let's confirm that by opening the assembled program, test1.lst. In line 44 you can see the address is now showing $8000. This is where the program will run, so it's best to point to that location when prompted later. In summary, whatever program you write will need a location pointer to where it should run as well as a routine_entry.asm file of the BIOS calls used in your program. Your routine_entry.asm file need only contain the actual calls used if you are concerned about program size. In our example, they were just PUTS and PRINT_NEW_LINE.
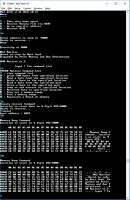
Can I load the ROM Monitor as a standalone program and run it from the BIOS? Yes, you can. Program m62monitor.asm contains a relocation pointer (MLOCATION .EQU $8000) as well as an INCLUDE for routine_entry.asm so all you need to do is run Assemble_m62monitor.BAT and use the BIOS "X" function to upload m62monitor.obj to RAM at $8000. Of course you can change the run location at the BIOS prompt as long as you change it in the m62monitor.asm file, too. Another example to try is Assemble_memdump.BAT and load it to location $A000 using the BIOS "X" command. Program memdump.asm already contains the relocation pointer for $A000 and the INCLUDE for the necessary routine_entry.asm file. In the adjacent panel is a screenshot labelled BIOS-Monitor-memdump. The Z80 BIOS is booted up, file m62monitor.obj is transferred to location $8000 where it executes, "?" is typed for the Monitor Command List, "x" is typed to start a file transfer from within the monitor program, and location $A000 is chosen for program memdump.obj. Once done, the monitor "d" command is executed and location $A000 is chosen. The result is the first $80 bytes of location $A000 where we uploaded the memdump.obj file. You can see the name of the program, etc. in the ASCII adjacent to the hex dump. Another dump is run for location $8000 where you can see indications that the monitor.obj was loaded there.
Summary With the BIOS providing calls to all other standalone programs you wish to create, you only need to include the call and not the code itself which already resides in the BIOS. You can upload as much code as you like in as many RAM locations as you like. The huge advantage to using a BIOS is that any changes to your standalone code does not need to be burned to ROM; you simply upload it to any predefined RAM location for testing. |
Eagle CAD: Serial-FTDI-RS232 Schematic
Example of routine_entry.asm
ROM BIOS Bootup Screen
test1 Standalone Program
BIOS-Monitor-memdump
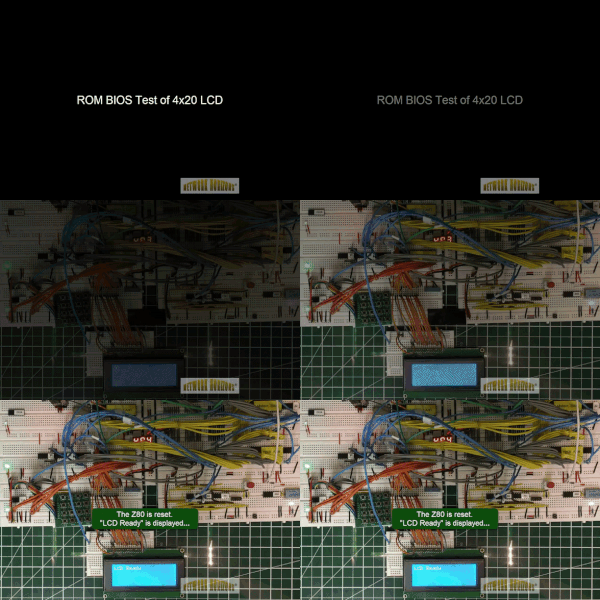
Short Video: ROM BIOS Test of 4x20 LCD Clicking the thumbnail gif above will provide an HD video (8.1MB, .mp4 format)
|

