|
Aduino 'Weather Inside' Project |
|
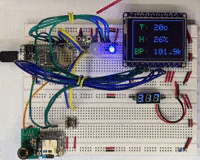
Overview: I have developed an Arduino-based system for measuring temperature, humidity and barometric pressure. Additionally, it can calculate Dew Point and Humidex. It was designed simply to take and record inside measurements, but could be expanded to perform external weather, too. WI (Weather Inside) uses a PIR motion sensor to only enable the OLED or LCD display when movement is detected. BREADBOARD EXAMPLE: CLICK FOR VIDEO
How does it work? A sensor is polled periodically to determine temp, humidity and barometric pressure weather stats; dewpoint and humidex are calculated. The stats are then written to a microSD. When there is nearby movement, a PIR detects it which enables a blue LED and turns on an LCD or OLED display of the current stats. The display is brief (2.5s) with just the basics but displays longer (5.5s) afterwards with the details. When the display on-time (cumulatively 8s) expires, both the blue LED and LCD/OLED display turn off. Every time interval (15s in the adjacent video), the stats are written to a microSD "drive" shown in the lower left. The green LED blinks at the start of the write and a red LED blinks at the end. Whether there is movement or not the writes continue periodically. This approach saves battery life if you wish to connect a LiPo to the lower PCB LiPo battery charger.
Four different microcontrollers (uC) were used in different configurations: - Atmel/Microchip ATmega328P microcontroller chip - Adafruit QT PY M0, Itsy Bitsy M4 Express and Feather M4 Express modules
The system configurations were constructed as: - Single board computer (SBC), stacked multi-board computer (MBC), and cube MBC
Enclosures used: - Project boxes: small (1Box), medium (2Box), large (3Box), and large wide (4Box) project boxes
The size of the system determines: - size of the OLED/LCD display, if any - number of circuits including microSD for logging of statistics - uC pins used: these will change depending on uC, board configuration and enclosure used - push-buttons (if any) or TFT/LCD buttons for configuration
Schematics, screenshots and short videos are provided for each controller/board/enclosure configuration.
Resources section lists all of the spec sheets, documents, etc., in one place.
Trending I am slowly modifying the code to include routines to measure temperature, humidity and barometric pressure (THBP) over time to determine if there is a significant change. If there is change, then the OLED display procedure (outOLEDbig()) will include UP or DOWN arrows to reflect the changes.
Sketches are made as general as possible so they can be used with many configurations. uC pin changes will be noted. For instance, there are no pins D2, D3, D7 and D8 on the Adafruit Feather M4 Express despite it being a larger uC. However, it does have its own I2C (SCL, SDA) and SPI (SCK, MOSI, MISO) and comm (TX, RX) pins that are fortunately not shared like they are on the ATmega328P uC. Use this sketch with any Cortex (M0 or M4) microcontroller configuration that uses an OLED display: WI_M0_2Box__Trend__q.ino. Current revision is "q".
OLED & LCD Displays All of the project configurations use either 1.3" 128x64 OLED or 0.96" 128x64 OLED displays. There is only one project variant and it is the largest of the configurations that uses the Hammond 1591XXS (4.43"L x 3.33"W) project box that can hold the 2.4" LCD panel. (This LCD uses Adafruit GFX drivers and not the U8X8 drivers.) When I first started developing the Weather Inside project it was on an ATmega328 microcontroller which is severely limited in memory by current (Cortex) standards. Subsequently, the Adafruit OLED display drivers would not run because the system continually ran out of memory. A little searching revealed the U8G2 and U8X8 drivers that were much more frugal with memory so text could be displayed on the OLEDs without the memory issues. All of the OLED display code in sketch WI_M0_2Box__Trend__q.ino uses the U8X8 drivers and not the Adafruit GFX drivers. If you wish to build the largest WI system, you'll need to use the M4_FeatherExpress_4Box_MBC__04g_TREND sketch that uses the Adafruit GFX drivers. |
|
|
|
2021-03-14 @ 3:20pm |