|
Z80 Programming III |
|
Beginning Z80 Assembly Language Programming |
|
Overview: Our first circuit was simply a Z80A CPU with all of the data pins, D0 to D7, tied to ground via 4.7K current limiting resistors. Why? Uh... because we wanted to see if it would work... and it did.
What Happened Exactly? The Z80 Program Counter (PC) expects to start at the 16-bit address $0000 (binary 0000 0000 0000 0000) and so it places $0000 on the 16-bit Address Bus, looking for a data bus response. "Stored" at location $0000 is the 8-bit value $00 which is used by the NOP instruction to do nothing. (The instruction is often used as a filler usually for timing reasons.) The 8-bit value $00 is placed on the Data Bus and is read by the CPU. The instruction says "Do Nothing" so the Z80 does just that - for 4 clock/machine cycles. (For more info see pages 7 and 8 of Timing.) There is no secondary part to this instruction that the CPU would have to fetch so the PC is incremented to location $0001. Once again, the PC value is put on the Address Bus to the memory resulting in the next instruction being put on the Data Bus and read by the CPU; it's another NOP! Where did these instructions come from? They are the effect of tying all of the eight Data Bus pins to ground via 4.7K current-limiting resistors: the CPU would only read $00 on the Data Bus.
Can We Code NOPs as a Program? Sure. If you followed directions in "Z80 Assembly: Setting up TASM32 Z80 Assembler", then you have already setup TASM to automatically assemble your Z80 code for you. If not... well, you really should. Here's the link. If you didn't setup Programmer's Notepad for automatic assembly, then you'll have to do it by hand. Here's the command string you'll need: "tasm.exe -80 -x -g3 -c -f00 filename.asm". The TASM manual explains the switches starting on page 2. I like the "-c" and "-f00" switches but you don't have to use them. When we build standalone executables, we won't be using those two switches or the code will break. For now, they zero out empty code areas of the EEPROM so we use them. This can be helpful if you're using multiple .ORG statements to place your data for the program to use. More on that much later.
TASM Directives We should set a few parameters in the program that our TASM Z80 Assembler needs in order to work properly. Let's start with a few "for instances". When a program runs, it is at a particular place in memory. Most ROM is setup via addressing so that its program starts at $0000; that's what the Z80 CPU is expecting. You can have it jump anywhere from there but address zero is where it starts. To tell the assembler where to run the program, we use the directive ".ORG" followed by an address; expect to see something like ".ORG $0000". If you're working with a prebuilt Z80 system, it may have been configured with ".ORG $0100" so your program/operating system (like CP/M) knows where to start.
Code Review
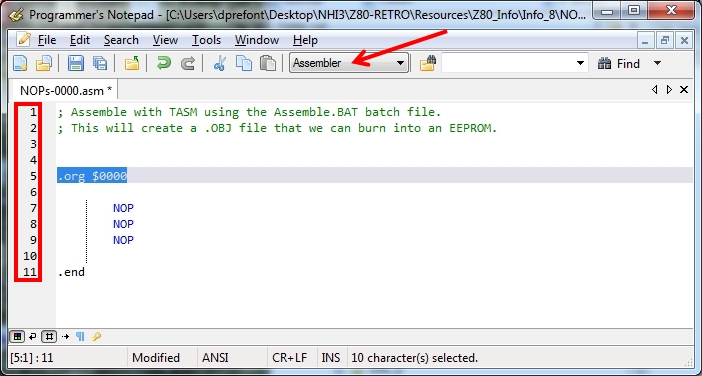
This is an example program called
NOPs-0000.asm.
At the top of the program tab within Programmer's Notepad, you can see the program name and the program below it. On the left are the decimal line numbers. The first two lines at the top of the program are shown in green. These are comments that are ignored by the assembler but they're usually important to us or anyone looking at the code. In Assembly language, we use the semi-colon ";" to tell the Assembler to ignore the rest of the line of code. In Arduino code two backslashes "//" denote "comments follow". How does PN know this is assembly code and not Arduino C++ code? The answer is in the middle of the icons bar near the top of PN. Assembler may have been chosen by default on your app. If not, now's the time to change it.
The first line of code at line 5 is ".ORG $0000". It means start running the code that follows at address location 0. Do we have to have this line of code? TASM doesn't care if it's there or not but you'll care when you start writing special boot routines. More on that a little later.
The next thing we see starting in line 7 and finishing in line 9 are "NOP" instructions which mean do nothing and do it 3 times. On line 11 following the NOPs is another directive to the assembler, ".END". It indicates there is nothing else for the assembler to work on. Hidden from view is an End Of File (EOF) character after the directive. In ASCII, it's one of the 32 characters that cannot be displayed: they are numbered $00 to $1F, and EOF is $1A. It's there - you just can't see it. Remove ".end" from your file and reassemble it. TASM will complain there was no END before EOF. Now you know EOF is there hiding after the ".END". |